In my previous blog post, we saw the selectors available in CSS 1 & 2. In this blog post, we shall continue our learning by looking at the new selectors in CSS 3.
 What happened here is that because each div tag had its id attribute starting with 'content', all of its content was italicized.
The syntax of this selector is element[attribute$=value].
Here is an example. Consider the following HTML:

 What happened here is that because each div tag had its id attribute containing the 'ten' character sequence (due to the word 'content'), all of its content was made bold.
Let's take a look at the first such pseudo-class, :nth-child, below. The remaining 10 pseudo-classes are similar with minor variations, & hence become easy to understand once you grok :nth-child. So, pay close attention.
The way this selector works is like this: you have to provide a formula of the form, an + b, when defining the selector, where a & b are integer values. Here, a represents a group of elements, and b represents the element inside the ath group. What the browser will then do is substitute values zero & above for n, and then evaluate the an+b expression. This will result in an integer that is the element for which the style is applied. For example, on substituting 0 for n, we get the first group, after which we can target the bth element in the group. Next, on substituting 1 for n, we get the second group, after which we can target the bth element in the group. This continues until all elements are exhausted.
This selector is useful in situations where multiple elements among a set of children have to applied the same style. Eg: alternating rows in a table need to be applied different background colours. In such cases, you'll have to construct the an+b formula in such a way that the required rows match.
The syntax of this selector is element:nth-child(an+b).
Consider this example HTML:
and we get the following output:
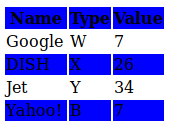
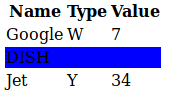
 What happened here is this: the browser started evaluating the formula by passing in values from 0 onwards to n. If we pass 0 to the formula, 2n + 3, then we get the value 3. Thus, you see the style applied to the 3rd row. If we pass 1 to the formula, then we get the value 5. Thus, you see the style applied to the 5th row. The browser will not evaluate further, since there are no more rows. Note here that because we gave the 'tr' tag in the selector, it included even the header row in its count.
This selector can be simplified further - for example, since the above CSS definition makes alternating rows to be a different background colour, you can change the definition to parent:nth-child(even) for even-numbered rows or parent:nth-child(odd) for odd-numbered rows.
As an example, if we change the CSS above to
 Here we can see that the style has been applied to all odd rows. As mentioned before, since we used 'tr' in the selector, the count starts from the header row. Since the header row is the first row, it is an odd-numbered row, and hence the style is applied for that row.
As you can see from the above two examples, having an an+b formula in your selector is more powerful, since most of the times, we don't want the header row to be part of the alternate row colouring.
You can also remove certain operands of the formula if you're sure the values of a or b can only be zero. Eg: parent:nth-child(0n+2) can also be written as parent:nth-child(2).
The syntax of this selector is element:nth-last-child(an+b).
Consider the same HTML seen above:
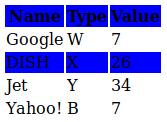 What happened here is this: 2n+3 evaluates to 3 when n=0, and 5 when n=1. The browser counts rows from the bottom - the row with the Name field set to DISH is the 3rd row, and the header row becomes the 5th row. Hence, the styles are applied to those rows.
The syntax of this selector is element:nth-of-type(an+b).
Consider the HTML:
The syntax of this selector is element:nth-last-of-type(an+b).
Consider the same HTML seen above:
The way this selector works is like this: In the pseudo-class, you only specify the type of the element - no information about the parent is necessary. The pseudo-class searches for all elements of that type, and then runs through each result to determine if it is a child of some element, and if yes, if it is the last child. The result of this check gives a list of elements for which the style is applied.
The syntax of this selector is element:last-child. Note that this selector cannot have a formula, as it will not make sense - we only need to select the last child element & nothing else.
Consider the example HTML below:
 What happened here is this: Of the 3 span tags, the first one didn't qualify because it had the div tag as a sibling following it - thus, it wasn't the last child for its parent. The first span tag inside the div tag also failed to qualify for the same reason. The second span tag inside the div qualified because it was a child, and it was the last child for its parent div tag.
The syntax of this selector is element:first-of-type. Note that this selector cannot have a formula, as it will not make sense - we only need to select the first required element & nothing else.
Consider our usual example,
The syntax of this selector is element:last-of-type. Note that this selector cannot have a formula, as it will not make sense - we only need to select the last required element & nothing else.
Consider our usual example,

The syntax of this selector is element:only-child. Note that this selector cannot have a formula, as it will not make sense - we only need to select a child element that does not have siblings.
Consider this example HTML,
The syntax of this selector is element:only-of-type. Note that this selector cannot have a formula, as it will not make sense - we only need to select a child element that is of a unique type among its siblings.
Consider the below HTML,
 What happened here is this: under the body tag, there is only one div tag. This means that it matches the definition of the :only-of-type pseudo-class which states that there must be only one child of that type for its parent. Thus, the style is applied to that single div tag.
What happens if we add one more div tag? The HTML becomes:
 Here the style was not applied, because the two div tags did not satisfy the condition of there being only one element of that type.
The syntax of this selector is element:empty. Note that this selector cannot have a formula, as it will not make sense - it only needs to select empty elements.
Consider this example HTML,
 What happened here is: The first div tag matched the selector since it was an empty element. The selector definition says that the word, "empty" must be added to the empty div, which is what we see.
The syntax of this selector is element:enabled or element:disabled.
Consider the following HTML that has two buttons,

The syntax of this selector is element:checked.
Consider the following HTML,
When unchecked,

When checked,

Consider the following HTML,
 What happened here? The selector looked for those elements that were not span tags, and then applied the styling only to those.
The syntax of this selector is element:target.
Let's consider this crazy example HTML that I just made up:
Now the reason I have so many div tags with dummy content inside them is so that when I load the page, I get a scrollbar, and some content is below the fold, as seen below:
Let's say I want the browser to load the page & directly scroll to some content that I want the user to focus on. HTML has the concept of fragment identifiers to achieve this. Fragment identifiers are those parts of the URL that begin after the URL with a '#' symbol, and which represent an HTML element's ID.
Let's apply this to our document. For doing so, we need a div tag with an ID. Notice that div tags with numbers 41-50 are wrapped in a special div tag with id, 'bottom_div'. You can use this id in the URL to make that ID come up in the browser's viewport, even if it normally would have been below the fold. Thus, on your browser, enter '#bottom_div' at the end of the URL. You will get the page like this:
 Now assume we apply the following CSS to the HTML:
Then on refreshing the page with the fragment identifier in the URL, we will get this:

What happened here? When loading the page with the fragment identifier, the browser automatically moved the viewport to that fragment, and the CSS selector applied the styling to highlight that portion. If the same page had not been loaded with the fragment identifier, then the styling would not have been applied even if the style definition existed in the CSS file.
The syntax of this selector is preceding_sibling ~ targeted_element.
Consider the following HTML,

New attribute selectors
CSS 3 introduces 3 new attribute selectors. These enable you to match elements based on substrings of the specified attribute's values. We'll take a look at each new selector below:Type 1
The first attribute selector matches those elements whose attribute value begins with the string specified in the selector. Note that the selector is case-sensitive - it will match the element only if the value specified in the selector is the same case as the substring in the attribute.
The syntax of the selector is element[attribute^=value].
Here is an example. Consider the following HTML:<div id="content-header">and the following CSS is applied to it:
<span>CSS 2 is now a Recommendation</span>
</div>
<div id="content-gist">
<span>The standards body has approved the various new features in CSS 2.</span>
</div>
<div id="content-body">
<span>Detailed info on CSS 2 is found here.</span>
</div>
div[id^=content] {font-style: italic;}then the output we get is this:
Type 2
The second attribute selector matches those elements whose attribute value ends with the string specified in the selector. This selector is also case-sensitive.The syntax of this selector is element[attribute$=value].
Here is an example. Consider the following HTML:
<div id="content-header">and the following CSS is applied to it:
<span>CSS 2 is now a Recommendation</span>
</div>
<div id="content-gist">
<span>The standards body has approved the various new features in CSS 2.</span>
</div>
<div id="content-body">
<span>Detailed info on CSS 2 is found here.</span>
</div>
div[id$=gist] {text-transform: uppercase;}then the output we get is this:
The property rule matched only the second div tag since only its id attribute ended with 'gist'.
Type 3
The third attribute selector matches those elements whose attribute value contains the string specified in the selector. This selector is also case-sensitive.The syntax of the selector is element[attribute*=value].
Here is an example. Consider the following HTML:<div id="content-header">and the following CSS is applied to it:
<span>CSS 2 is now a Recommendation</span>
</div>
<div id="content-gist">
<span>The standards body has approved the various new features in CSS 2.</span>
</div>
<div id="content-body">
<span>Detailed info on CSS 2 is found here.</span>
</div>
div[id*=ten] {font-weight: bold;}then the output we get is this:
Structural pseudo-classes
CSS 3 introduces 11 new pseudo-classes for selecting elements based on their position in the document tree but which cannot be determined using the existing selectors.Let's take a look at the first such pseudo-class, :nth-child, below. The remaining 10 pseudo-classes are similar with minor variations, & hence become easy to understand once you grok :nth-child. So, pay close attention.
:nth-child(an+b)
This selector is very powerful in selecting particular elements among multiple available elements. What this selector does is it splits all the elements into groups, and you can then specify individual elements inside those groups to target. Thus, you can build a powerful selector that targets specific elements.The way this selector works is like this: you have to provide a formula of the form, an + b, when defining the selector, where a & b are integer values. Here, a represents a group of elements, and b represents the element inside the ath group. What the browser will then do is substitute values zero & above for n, and then evaluate the an+b expression. This will result in an integer that is the element for which the style is applied. For example, on substituting 0 for n, we get the first group, after which we can target the bth element in the group. Next, on substituting 1 for n, we get the second group, after which we can target the bth element in the group. This continues until all elements are exhausted.
This selector is useful in situations where multiple elements among a set of children have to applied the same style. Eg: alternating rows in a table need to be applied different background colours. In such cases, you'll have to construct the an+b formula in such a way that the required rows match.
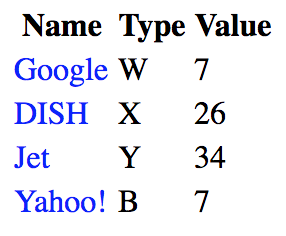
The syntax of this selector is element:nth-child(an+b).
Consider this example HTML:
<tr>We apply the below CSS to the HTML,
<th>Name</th>
<th>Type</th>
<th>Value</th>
</tr>
<tr>
<td>Google</td>
<td>W</td>
<td>7</td>
</tr>
<tr>
<td>DISH</td>
<td>X</td>
<td>26</td>
</tr>
<tr>
<td>Jet</td>
<td>Y</td>
<td>34</td>
</tr>
<tr>
<td>Yahoo!</td>
<td>B</td>
<td>7</td>
</tr>
tr:nth-child(2n+3) {background-color:blue;}
This selector can be simplified further - for example, since the above CSS definition makes alternating rows to be a different background colour, you can change the definition to parent:nth-child(even) for even-numbered rows or parent:nth-child(odd) for odd-numbered rows.
As an example, if we change the CSS above to
tr:nth-child(odd) {background-color:blue;}we get this:
As you can see from the above two examples, having an an+b formula in your selector is more powerful, since most of the times, we don't want the header row to be part of the alternate row colouring.
You can also remove certain operands of the formula if you're sure the values of a or b can only be zero. Eg: parent:nth-child(0n+2) can also be written as parent:nth-child(2).
Advantage of this selector
This selector has one other advantage which I haven't seen mentioned anywhere. Often, I have seen & written code like this in dynamically rendered pages:<table>What's happening here is that we're checking to see if the row of the table we're rendering is an odd-numbered row. If yes, we add a CSS class to render that row in a background colour different from the even-numbered rows. If you see such code, you can replace them with this selector.
<% for each item in collection %>
<% if row.counter % 2 != 0 %>
<tr class = 'highlight'>
<% else %>
<tr>
<% end %>
content </tr>
<% end %>
</table>
:nth-last-child(an+b)
This is similar to the :nth-child selector, except that it builds groups from the last element, rather than the first. Thus, after evaluating the an+b formula, you'll see that the browser's output is the reverse of nth-child.The syntax of this selector is element:nth-last-child(an+b).
Consider the same HTML seen above:
<tr>If we apply this CSS style,
<th>Name</th>
<th>Type</th>
<th>Value</th>
</tr>
<tr>
<td>Google</td>
<td>W</td>
<td>7</td>
</tr>
<tr>
<td>DISH</td>
<td>X</td>
<td>26</td>
</tr>
<tr>
<td>Jet</td>
<td>Y</td>
<td>34</td>
</tr>
<tr>
<td>Yahoo!</td>
<td>B</td>
<td>7</td>
</tr>
tr:nth-last-child(2n+3) {background-color: blue;}then we get the following output
:nth-of-type(an+b)
This selector also follows the an+b format and selects an element which is the (an+b)th element among a set of elements. However, this selector will only select those elements of a specified type (aka HTML tag). Other elements not of the specified type will not be considered while applying the formula. This is useful when you know that other element types will be interspersed among the collection of elements that you are targeting.The syntax of this selector is element:nth-of-type(an+b).
Consider the HTML:
<span>First span tag</span>
<span>Second span tag</span>
<div>First div tag</div>
<span>Third span tag</span>
<div>Second div tag</div>
<span>Fourth span tag</span>
If we apply this CSS style definition,
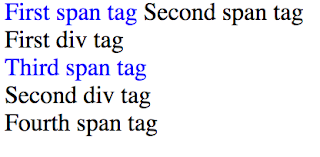
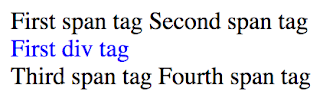
span:nth-of-type(2n+1) {color: blue;}
then we get the following output:

What happened here is this: 2n + 1 formula evaluates to 1 when n=0, and 3 when n=1. If we had used :nth-child instead of :nth-of-type, then the style would have been applied to the first span tag & the first div tag. However, we have used :nth-of-type, which will apply the style only if they belong to the specified HTML type. In our case, that type is span. Hence, the style should be applied to the first & third span tags only, which is exactly what we see.
:nth-last-of-type(an+b)
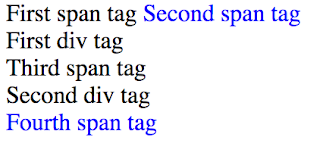
This is similar to the :nth-of-type selector, except that it starts counting the children from the last child, rather than the first child. As stated in :nth-of-type, this selector does not count those children who are not of the specified type.The syntax of this selector is element:nth-last-of-type(an+b).
Consider the same HTML seen above:
<span>First span tag</span>
<span>Second span tag</span>
<div>First div tag</div>
<span>Third span tag</span>
<div>Second div tag</div>
<span>Fourth span tag</span>
If we apply this CSS style definition,
span:nth-last-of-type(2n+1) {color: blue;}
then we get the following output:

:last-child
This selector simply selects the last child of the parent. (For those wondering if we have a corresponding :first-child selector, it was already introduced in CSS 2).The way this selector works is like this: In the pseudo-class, you only specify the type of the element - no information about the parent is necessary. The pseudo-class searches for all elements of that type, and then runs through each result to determine if it is a child of some element, and if yes, if it is the last child. The result of this check gives a list of elements for which the style is applied.
The syntax of this selector is element:last-child. Note that this selector cannot have a formula, as it will not make sense - we only need to select the last child element & nothing else.
Consider the example HTML below:
<span>under the body tag</span> <div>for which we apply the following CSS,
<span>First child under the div tag</span>
<span>Second child under the div tag</span> </div>
span:last-child {color:blue;}Then the output we get is this:
:first-of-type
This selector selects those elements of a particular type, and which are a child of a parent and which are the first among the children of that type.The syntax of this selector is element:first-of-type. Note that this selector cannot have a formula, as it will not make sense - we only need to select the first required element & nothing else.
Consider our usual example,
<tr>If we apply the following CSS,
<th>Name</th>
<th>Type</th>
<th>Value</th>
</tr>
<tr>
<td>Google</td>
<td>W</td>
<td>7</td>
</tr>
<tr>
<td>DISH</td>
<td>X</td>
<td>26</td>
</tr>
<tr>
<td>Jet</td>
<td>Y</td>
<td>34</td>
</tr>
<tr>
<td>Yahoo!</td>
<td>B</td>
<td>7</td>
</tr>
td:first-of-type {color: blue;}then we get
What happened here is this: Of all available td tags, only the first td tag under each tr tag matched this selector. Hence, only those td tags got the style applied.
:last-of-type
This selector is similar to :first-of-type selector, but it selects the last element instead of the first.The syntax of this selector is element:last-of-type. Note that this selector cannot have a formula, as it will not make sense - we only need to select the last required element & nothing else.
Consider our usual example,
<tr>If we apply the following CSS,
<th>Name</th>
<th>Type</th>
<th>Value</th>
</tr>
<tr>
<td>Google</td>
<td>W</td>
<td>7</td>
</tr>
<tr>
<td>DISH</td>
<td>X</td>
<td>26</td>
</tr>
<tr>
<td>Jet</td>
<td>Y</td>
<td>34</td>
</tr>
<tr>
<td>Yahoo!</td>
<td>B</td>
<td>7</td>
</tr>
td:last-of-type {color: blue;}then we get
What happened here is this: Of all available td tags, only the last td tag under each tr tag matched this selector. Hence, only those td tags got the style applied.
:only-child
This selector selects only those elements that are children of an element, and are the only child for that element.The syntax of this selector is element:only-child. Note that this selector cannot have a formula, as it will not make sense - we only need to select a child element that does not have siblings.
Consider this example HTML,
<tr>When we apply the following CSS,
<th>Name</th>
<th>Type</th>
<th>Value</th>
</tr>
<tr>
<td>Google</td>
<td>W</td>
<td>7</td>
</tr>
<tr>
<td colspan=3>DISH</td>
</tr>
<tr>
<td>Jet</td>
<td>Y</td>
<td>34</td>
</tr>
td:only-child {background-color: blue;}we get,
:only-of-type
This selector selects only those elements that are children of an element, and are the only children of that type.The syntax of this selector is element:only-of-type. Note that this selector cannot have a formula, as it will not make sense - we only need to select a child element that is of a unique type among its siblings.
Consider the below HTML,
<body>When we apply the following CSS,
<span>First span tag</span>
<span>Second span tag</span>
<div>First div tag</div>
<span>Third span tag</span>
<span>Fourth span tag</span>
</body>
div:only-of-type {color: blue;}we get,

What happens if we add one more div tag? The HTML becomes:
<body>and the output becomes
<span>First span tag</span>
<span>Second span tag</span>
<div>First div tag</div>
<div>Second div tag</div>
<span>Third span tag</span>
<span>Fourth span tag</span>
</body>

:empty
The empty selector selects those elements that do not have any children.The syntax of this selector is element:empty. Note that this selector cannot have a formula, as it will not make sense - it only needs to select empty elements.
Consider this example HTML,
<div></div>and this CSS that we apply to the HTML,
<div>First span</div>
div:empty:before {content: "empty";}Then we get this output:
UI element state pseudo-classes
CSS 3 provides 3 pseudo-classes that let you select elements based on the current UI state of the element. The states supported are: :enabled, :disabled & :checked. The last one obviously is only for checkboxes & radiobuttons.:enabled & :disabled
The :enabled & :disabled pseudo-classes enable us to write selectors that match those elements which are enabled (or) disabled respectively. Thus, we can apply different styles to elements based on the UI state of the element.The syntax of this selector is element:enabled or element:disabled.
Consider the following HTML that has two buttons,
<input type=button value="Button 1"/>When the following CSS is applied to it,
<input type=button value="Button 2" disabled />
input:enabled {color:red;}then we get
input:disabled {color:blue;}
:checked
This pseudo-class enables developers to assign styles if the particular checkbox or radiobutton is checked.The syntax of this selector is element:checked.
Consider the following HTML,
<input type=checkbox value="1" id="name"/>to which we apply the following CSS,
<label for="name">Travelling alone?</label>
input:checked + label {color: green;}We get the following output:
When unchecked,
When checked,
Negation pseudo-class
Till now, most selectors that you saw matched elements if they met the conditions the selectors imposed. CSS 3 introduces a new selector which selects those elements if they do not meet a particular condition.Consider the following HTML,
<div>First div</div>to which we apply the following CSS,
<span>First span</span>
<span>Second span</span>
<div>Second div</div>
body *:not(span) {color: blue;}on which we get the following output:
The :target pseudo-class
Some URLs have a fragment identifier so that the user agent can load the URL and then move the viewport to the relevant section of the page. In such cases, it may be necessary to apply special styling to highlight the particular portion of the page. The :target pseudo-class can be used for this purpose.The syntax of this selector is element:target.
Let's consider this crazy example HTML that I just made up:
<div>
<div>div 1</div>
<div>div 2</div>
<div>div 3</div>
<div>div 4</div>
<div>div 5</div>
<div>div 6</div>
<div>div 7</div>
<div>div 8</div>
<div>div 9</div>
<div>div 10</div>
</div>
<div>
<div>div 11</div>
<div>div 12</div>
<div>div 13</div>
<div>div 14</div>
<div>div 15</div>
<div>div 16</div>
<div>div 17</div>
<div>div 18</div>
<div>div 19</div>
<div>div 20</div>
</div>
<div>
<div>div 21</div>
<div>div 22</div>
<div>div 23</div>
<div>div 24</div>
<div>div 25</div>
<div>div 26</div>
<div>div 27</div>
<div>div 28</div>
<div>div 29</div>
<div>div 30</div>
</div>
<div>
<div>div 31</div>
<div>div 32</div>
<div>div 33</div>
<div>div 34</div>
<div>div 35</div>
<div>div 36</div>
<div>div 37</div>
<div>div 38</div>
<div>div 39</div>
<div>div 40</div>
</div>
<div id=bottom_div>
<div>div 41</div>
<div>div 42</div>
<div>div 43</div>
<div>div 44</div>
<div>div 45</div>
<div>div 46</div>
<div>div 47</div>
<div>div 48</div>
<div>div 49</div>
<div>div 50</div>
</div>
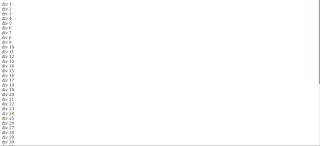
Now the reason I have so many div tags with dummy content inside them is so that when I load the page, I get a scrollbar, and some content is below the fold, as seen below:

Let's apply this to our document. For doing so, we need a div tag with an ID. Notice that div tags with numbers 41-50 are wrapped in a special div tag with id, 'bottom_div'. You can use this id in the URL to make that ID come up in the browser's viewport, even if it normally would have been below the fold. Thus, on your browser, enter '#bottom_div' at the end of the URL. You will get the page like this:

#bottom_div:target {color:red;}
Then on refreshing the page with the fragment identifier in the URL, we will get this:

What happened here? When loading the page with the fragment identifier, the browser automatically moved the viewport to that fragment, and the CSS selector applied the styling to highlight that portion. If the same page had not been loaded with the fragment identifier, then the styling would not have been applied even if the style definition existed in the CSS file.
Preceding sibling selector
This selector is used to select those elements which are preceded by certain specified elements.The syntax of this selector is preceding_sibling ~ targeted_element.
Consider the following HTML,
<div>to which we apply the following CSS:
<ul>
<li>
<span>This is the first list item.</span>
</li>
</ul>
</div>
<span>First span under div</span>
<span>Second span under div</span>
div~span {color:blue;}In that case, we get the following output

What happened here is that the browser looked for span tags that appeared immediately after div tags. Only those span tags that matched this condition were applied the style. Thus, the last two span tags got the style, while the span tag inside the div did not.
